Server Installation
Requires Access to Server File System
The QuadriSpace Local S3D Server is a small PHP and JavaScript based web app for managing S3D files and delivering HTML5 3D web content.
Server Requirements
The Share3D On-Premise Server can be installed on most PHP 5 capable web servers. Windows and Linus servers are supported.
Quick Start - Server Installation Steps
- Copy the Share3DOnPremise.zip or Share3DOnPremise.tar file to a folder on your web server. The location shouldn’t matter.
- Unzip the server files on the server. This will install the files needed to run the server.
- Enter the URL for the server into a browser.
- Follow the instructions for installation from there.
Server Installation Steps
Once you have unzipped the installation file and pointed your web browser to the appropriate URL, you will be guided through the following general steps:
- Install Ion Cube. This is a third party license management product that manages the Share3D server license
- Request a server license file
- Install the server license file
- Configure you php.ini file to allow larger uploads
- Sign in as Admin and set up your Share3D On-Premise Server
About Ion Cube
The Share3D On-Premise Server utilizes ION Cube technology to manage licensing. If not already installed on your server, then you will need to make sure that the latest ION Cube loaders are installed.
You will be prompted to install this during the process above. However, if you find the need to install this manually, instructions for installing ION Cube loaders are available at: http://www.ioncube.com/loaders.php
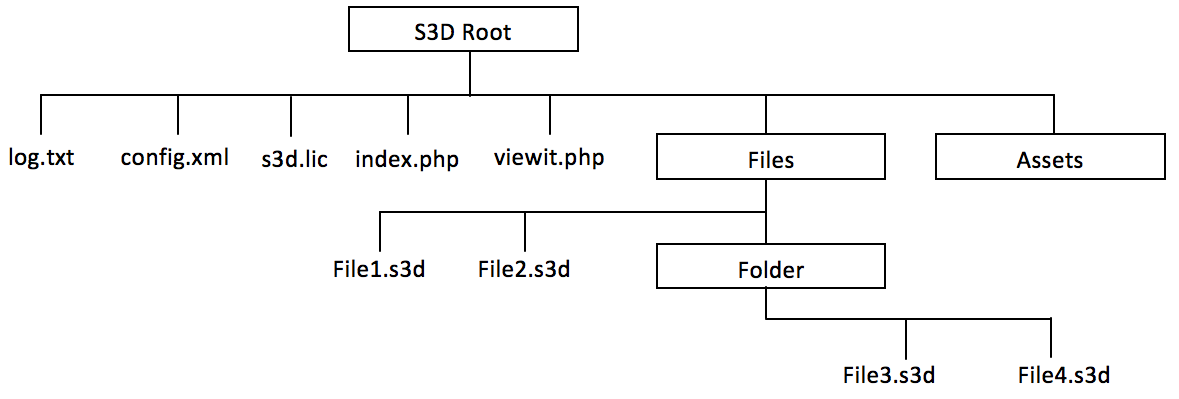
Directory Structure
The Local S3D Server consists of an application PHP file, a config file, and one or more 3D Viewing templates that control the appearance when viewing S3D files.

| File or Folder | Description |
|---|---|
| S3D Root | The folder that you installed S3D Local Server to |
| Files | Folder containing S3D files for viewing. Subfolders are allowed. |
| viewit.php | Template for viewing S3D files |
| index.php | Local S3D Server app |
| config.xml | User settings file |
| s3d.lic | S3D Server License File |
| .log.txt | Log File |
| Uploads | Folder enable for uploading files through S3D Server |
| .s3d | 3D Documents |
Configuring your PHP.ini file for Larger Uploads
If you want to allow users to upload S3D files directly to the upload folders of the S3D Server, then you will probably need to modify your web server’s php.ini file. The default for most php installs restricts the size of uploads to 3 MB. I would recommend increasing this to 50 MB initially. Change the following entries in your php.ini file and restart your web server. It is recommended that post_max_size be greater than upload_max_size.
post_max_size=64M
upload_max_filesize = 30M
Signing Into the Server
User logins may be set to have permissions as either user, editor or administrator. Administrator access is required to setup your server.
By default, two user accounts are created on installation.
| Name | Password | Type |
|---|---|---|
| admin | admin | Administrator |
| user | user | View Only |
It is recommended that you change these passwords.
Updated less than a minute ago
